http://lhdangerous.godohosting.com/wiki/index.php?action=history&feed=atom&title=Raspberry_pi_%EC%97%90%EC%84%9C_python%EC%9C%BC%EB%A1%9C_GPIO_%EC%82%AC%EC%9A%A9%ED%95%98%EA%B8%B0
Raspberry pi 에서 python으로 GPIO 사용하기 - 편집 역사
2026-06-17T12:50:12Z
이 문서의 편집 역사
MediaWiki 1.28.2
http://lhdangerous.godohosting.com/wiki/index.php?title=Raspberry_pi_%EC%97%90%EC%84%9C_python%EC%9C%BC%EB%A1%9C_GPIO_%EC%82%AC%EC%9A%A9%ED%95%98%EA%B8%B0&diff=260&oldid=prev
2019년 9월 14일 (토) 03:01에 Doguin님의 편집
2019-09-14T03:01:21Z
<p></p>
<a href="http://lhdangerous.godohosting.com/wiki/index.php?title=Raspberry_pi_%EC%97%90%EC%84%9C_python%EC%9C%BC%EB%A1%9C_GPIO_%EC%82%AC%EC%9A%A9%ED%95%98%EA%B8%B0&diff=260&oldid=199">차이 보기</a>
Doguin
http://lhdangerous.godohosting.com/wiki/index.php?title=Raspberry_pi_%EC%97%90%EC%84%9C_python%EC%9C%BC%EB%A1%9C_GPIO_%EC%82%AC%EC%9A%A9%ED%95%98%EA%B8%B0&diff=199&oldid=prev
2018년 6월 7일 (목) 18:43에 Doguin님의 편집
2018-06-07T18:43:07Z
<p></p>
<table class="diff diff-contentalign-left" data-mw="interface">
<col class='diff-marker' />
<col class='diff-content' />
<col class='diff-marker' />
<col class='diff-content' />
<tr style='vertical-align: top;' lang='ko'>
<td colspan='2' style="background-color: white; color:black; text-align: center;">← 이전 판</td>
<td colspan='2' style="background-color: white; color:black; text-align: center;">2018년 6월 7일 (목) 18:43 판</td>
</tr><tr><td colspan="2" class="diff-lineno" id="mw-diff-left-l5" >5번째 줄:</td>
<td colspan="2" class="diff-lineno">5번째 줄:</td></tr>
<tr><td class='diff-marker'> </td><td style="background-color: #f9f9f9; color: #333333; font-size: 88%; border-style: solid; border-width: 1px 1px 1px 4px; border-radius: 0.33em; border-color: #e6e6e6; vertical-align: top; white-space: pre-wrap;"><div>## 기본 사용법</div></td><td class='diff-marker'> </td><td style="background-color: #f9f9f9; color: #333333; font-size: 88%; border-style: solid; border-width: 1px 1px 1px 4px; border-radius: 0.33em; border-color: #e6e6e6; vertical-align: top; white-space: pre-wrap;"><div>## 기본 사용법</div></td></tr>
<tr><td class='diff-marker'> </td><td style="background-color: #f9f9f9; color: #333333; font-size: 88%; border-style: solid; border-width: 1px 1px 1px 4px; border-radius: 0.33em; border-color: #e6e6e6; vertical-align: top; white-space: pre-wrap;"><div>* 먼저 모듈을 임포트한다. (필수)</div></td><td class='diff-marker'> </td><td style="background-color: #f9f9f9; color: #333333; font-size: 88%; border-style: solid; border-width: 1px 1px 1px 4px; border-radius: 0.33em; border-color: #e6e6e6; vertical-align: top; white-space: pre-wrap;"><div>* 먼저 모듈을 임포트한다. (필수)</div></td></tr>
<tr><td colspan="2"> </td><td class='diff-marker'>+</td><td style="color:black; font-size: 88%; border-style: solid; border-width: 1px 1px 1px 4px; border-radius: 0.33em; border-color: #a3d3ff; vertical-align: top; white-space: pre-wrap;"><div><ins style="font-weight: bold; text-decoration: none;"></ins></div></td></tr>
<tr><td class='diff-marker'> </td><td style="background-color: #f9f9f9; color: #333333; font-size: 88%; border-style: solid; border-width: 1px 1px 1px 4px; border-radius: 0.33em; border-color: #e6e6e6; vertical-align: top; white-space: pre-wrap;"><div>``` python</div></td><td class='diff-marker'> </td><td style="background-color: #f9f9f9; color: #333333; font-size: 88%; border-style: solid; border-width: 1px 1px 1px 4px; border-radius: 0.33em; border-color: #e6e6e6; vertical-align: top; white-space: pre-wrap;"><div>``` python</div></td></tr>
<tr><td class='diff-marker'> </td><td style="background-color: #f9f9f9; color: #333333; font-size: 88%; border-style: solid; border-width: 1px 1px 1px 4px; border-radius: 0.33em; border-color: #e6e6e6; vertical-align: top; white-space: pre-wrap;"><div>import RPi.GPIO as GPIO</div></td><td class='diff-marker'> </td><td style="background-color: #f9f9f9; color: #333333; font-size: 88%; border-style: solid; border-width: 1px 1px 1px 4px; border-radius: 0.33em; border-color: #e6e6e6; vertical-align: top; white-space: pre-wrap;"><div>import RPi.GPIO as GPIO</div></td></tr>
<tr><td class='diff-marker'> </td><td style="background-color: #f9f9f9; color: #333333; font-size: 88%; border-style: solid; border-width: 1px 1px 1px 4px; border-radius: 0.33em; border-color: #e6e6e6; vertical-align: top; white-space: pre-wrap;"><div>```</div></td><td class='diff-marker'> </td><td style="background-color: #f9f9f9; color: #333333; font-size: 88%; border-style: solid; border-width: 1px 1px 1px 4px; border-radius: 0.33em; border-color: #e6e6e6; vertical-align: top; white-space: pre-wrap;"><div>```</div></td></tr>
<tr><td colspan="2"> </td><td class='diff-marker'>+</td><td style="color:black; font-size: 88%; border-style: solid; border-width: 1px 1px 1px 4px; border-radius: 0.33em; border-color: #a3d3ff; vertical-align: top; white-space: pre-wrap;"><div><ins style="font-weight: bold; text-decoration: none;"></ins></div></td></tr>
<tr><td class='diff-marker'> </td><td style="background-color: #f9f9f9; color: #333333; font-size: 88%; border-style: solid; border-width: 1px 1px 1px 4px; border-radius: 0.33em; border-color: #e6e6e6; vertical-align: top; white-space: pre-wrap;"><div>* 핀 넘버를 부르는 방식을 선택한다.(필수)</div></td><td class='diff-marker'> </td><td style="background-color: #f9f9f9; color: #333333; font-size: 88%; border-style: solid; border-width: 1px 1px 1px 4px; border-radius: 0.33em; border-color: #e6e6e6; vertical-align: top; white-space: pre-wrap;"><div>* 핀 넘버를 부르는 방식을 선택한다.(필수)</div></td></tr>
<tr><td class='diff-marker'> </td><td style="background-color: #f9f9f9; color: #333333; font-size: 88%; border-style: solid; border-width: 1px 1px 1px 4px; border-radius: 0.33em; border-color: #e6e6e6; vertical-align: top; white-space: pre-wrap;"><div>``` python</div></td><td class='diff-marker'> </td><td style="background-color: #f9f9f9; color: #333333; font-size: 88%; border-style: solid; border-width: 1px 1px 1px 4px; border-radius: 0.33em; border-color: #e6e6e6; vertical-align: top; white-space: pre-wrap;"><div>``` python</div></td></tr>
</table>
Doguin
http://lhdangerous.godohosting.com/wiki/index.php?title=Raspberry_pi_%EC%97%90%EC%84%9C_python%EC%9C%BC%EB%A1%9C_GPIO_%EC%82%AC%EC%9A%A9%ED%95%98%EA%B8%B0&diff=198&oldid=prev
2018년 6월 7일 (목) 18:36에 Doguin님의 편집
2018-06-07T18:36:21Z
<p></p>
<table class="diff diff-contentalign-left" data-mw="interface">
<col class='diff-marker' />
<col class='diff-content' />
<col class='diff-marker' />
<col class='diff-content' />
<tr style='vertical-align: top;' lang='ko'>
<td colspan='2' style="background-color: white; color:black; text-align: center;">← 이전 판</td>
<td colspan='2' style="background-color: white; color:black; text-align: center;">2018년 6월 7일 (목) 18:36 판</td>
</tr><tr><td colspan="2" class="diff-lineno" id="mw-diff-left-l1" >1번째 줄:</td>
<td colspan="2" class="diff-lineno">1번째 줄:</td></tr>
<tr><td class='diff-marker'> </td><td style="background-color: #f9f9f9; color: #333333; font-size: 88%; border-style: solid; border-width: 1px 1px 1px 4px; border-radius: 0.33em; border-color: #e6e6e6; vertical-align: top; white-space: pre-wrap;"><div># 라즈베리파이에서 파이썬으로 GPIO 사용하기</div></td><td class='diff-marker'> </td><td style="background-color: #f9f9f9; color: #333333; font-size: 88%; border-style: solid; border-width: 1px 1px 1px 4px; border-radius: 0.33em; border-color: #e6e6e6; vertical-align: top; white-space: pre-wrap;"><div># 라즈베리파이에서 파이썬으로 GPIO 사용하기</div></td></tr>
<tr><td class='diff-marker'>−</td><td style="color:black; font-size: 88%; border-style: solid; border-width: 1px 1px 1px 4px; border-radius: 0.33em; border-color: #ffe49c; vertical-align: top; white-space: pre-wrap;"><div><del class="diffchange diffchange-inline">@(4_skills)</del></div></td><td class='diff-marker'>+</td><td style="color:black; font-size: 88%; border-style: solid; border-width: 1px 1px 1px 4px; border-radius: 0.33em; border-color: #a3d3ff; vertical-align: top; white-space: pre-wrap;"><div> </div></td></tr>
<tr><td class='diff-marker'> </td><td style="background-color: #f9f9f9; color: #333333; font-size: 88%; border-style: solid; border-width: 1px 1px 1px 4px; border-radius: 0.33em; border-color: #e6e6e6; vertical-align: top; white-space: pre-wrap;"><div>raspberry pi 에서  Python으로 GPIO 제어하기 위해서 사용하는 모듈은 **RPi.GPIO** . 참고로 C를 사용한다면 **WiringPi** 라이브러리를 사용해 Arduino와 비슷하게 사용할 수도 있다.  여기서는 RPi.GPIO모듈을 사용해 Python으로 GPIO제어토록 해보자.</div></td><td class='diff-marker'> </td><td style="background-color: #f9f9f9; color: #333333; font-size: 88%; border-style: solid; border-width: 1px 1px 1px 4px; border-radius: 0.33em; border-color: #e6e6e6; vertical-align: top; white-space: pre-wrap;"><div>raspberry pi 에서  Python으로 GPIO 제어하기 위해서 사용하는 모듈은 **RPi.GPIO** . 참고로 C를 사용한다면 **WiringPi** 라이브러리를 사용해 Arduino와 비슷하게 사용할 수도 있다.  여기서는 RPi.GPIO모듈을 사용해 Python으로 GPIO제어토록 해보자.</div></td></tr>
<tr><td class='diff-marker'> </td><td style="background-color: #f9f9f9; color: #333333; font-size: 88%; border-style: solid; border-width: 1px 1px 1px 4px; border-radius: 0.33em; border-color: #e6e6e6; vertical-align: top; white-space: pre-wrap;"></td><td class='diff-marker'> </td><td style="background-color: #f9f9f9; color: #333333; font-size: 88%; border-style: solid; border-width: 1px 1px 1px 4px; border-radius: 0.33em; border-color: #e6e6e6; vertical-align: top; white-space: pre-wrap;"></td></tr>
</table>
Doguin
http://lhdangerous.godohosting.com/wiki/index.php?title=Raspberry_pi_%EC%97%90%EC%84%9C_python%EC%9C%BC%EB%A1%9C_GPIO_%EC%82%AC%EC%9A%A9%ED%95%98%EA%B8%B0&diff=197&oldid=prev
Doguin: 새 문서: # 라즈베리파이에서 파이썬으로 GPIO 사용하기 @(4_skills) raspberry pi 에서 Python으로 GPIO 제어하기 위해서 사용하는 모듈은 **RPi.GPIO** . 참고로...
2018-06-07T18:36:05Z
<p>새 문서: # 라즈베리파이에서 파이썬으로 GPIO 사용하기 @(4_skills) raspberry pi 에서 Python으로 GPIO 제어하기 위해서 사용하는 모듈은 **RPi.GPIO** . 참고로...</p>
<p><b>새 문서</b></p><div># 라즈베리파이에서 파이썬으로 GPIO 사용하기<br />
@(4_skills)<br />
raspberry pi 에서 Python으로 GPIO 제어하기 위해서 사용하는 모듈은 **RPi.GPIO** . 참고로 C를 사용한다면 **WiringPi** 라이브러리를 사용해 Arduino와 비슷하게 사용할 수도 있다. 여기서는 RPi.GPIO모듈을 사용해 Python으로 GPIO제어토록 해보자.<br />
<br />
## 기본 사용법<br />
* 먼저 모듈을 임포트한다. (필수)<br />
``` python<br />
import RPi.GPIO as GPIO<br />
```<br />
* 핀 넘버를 부르는 방식을 선택한다.(필수)<br />
``` python<br />
GPIO.setmode(GPIO.BOARD)<br />
#or<br />
GPIO.setmode(GPIO.BCM)<br />
```<br />
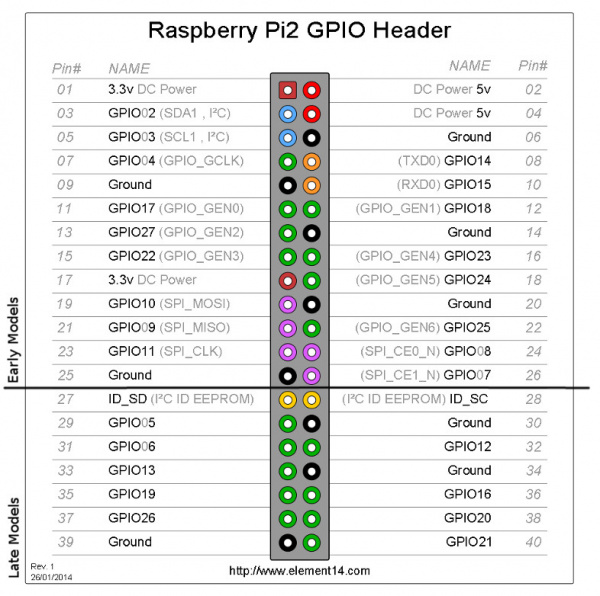
GPIO.BOARD 는 라즈베리파이에 배열된 순서대로 핀 이름을 부르겠다는 의미이고, GPIO.BCM은 (Broadcom chip-specific pin numbers) 로 Broadcom SOC 칩에서 사용하는 핀이름을 사용하겠다는 의미.<br />
즉, GPIO.BOARD 모드에서 8번핀은 GPIO.BCM 모드에서 14번 핀과 동일하다.<br />
<br />
* 핀 모드를 설정한다. 아두이노에서 `pinMode()` 와 같은 역할.(필수)<br />
``` python<br />
GPIO.setup(18, GPIO.OUT)<br />
#or<br />
GPIO.setup(18, GPIO.IN)<br />
```<br />
list를 사용해 한번에 여러 핀을 설정 할 수도 있고, output 모드로 설정하는 경우 초기값을 줄 수도 있다.<br />
``` python<br />
GPIO.setup([18, 19, 20], GPIO.OUT, initial=GPIO.HIGH)<br />
```<br />
input 모드로 설정하는 경우, 필요에 따라 내장 pull-up, pull-down 저항을 사용할 수도 있다.<br />
``` python<br />
GPIO.setup(18, GPIO.IN, pull_up_down = GPIO.PUD_UP)<br />
#or<br />
GPIO.setup(18, GPIO.IN, pull_up_down = GPIO.PUD_DOWN)<br />
```<br />
* digital output<br />
``` python<br />
import time<br />
<br />
GPIO.output(18, GPIO.HIGH)<br />
time.sleep(0.1) # 100 millisecond 딜레이<br />
GPIO.output(18,GPIO.LOW)<br />
```<br />
`GPIO.HIGH` 대신 `True `나 `1`을 써도 좋다. `GPIO.LOW` 대신에는 `False`나 `0`<br />
<br />
* analog output (pwm)<br />
RPi는 기본적으로 2개의 hardware PWM 채널을 가지고 있는데, 아쉽게도 RPi.GPIO에서는 사용할 방법이 없다. (C로 wiringPi를 사용하는경우 1개 채널(GPIO18) 사용가능.) 대신 software PWM을 어느 핀에서든 사용할 수 있다. 동시에 여러개도 가능하다.(참고:https://www.raspberrypi.org/forums/viewtopic.php?f=44&t=31714)<br />
``` python<br />
#swPWM 초기화<br />
myPwm = GPIO.PWM(18, 1000) # pin, frequency<br />
myPwm.start(50) #dutycycle (0~100사이 값). 아두이노로 치면 analogWrite(18, 128)과 동일.<br />
<br />
# 출력값 변경<br />
myPwm.ChangeDutyCycle(75)<br />
<br />
#swPWM 정지<br />
myPwm.stop()<br />
```<br />
* digital input<br />
``` python<br />
pin_read = GPIO.input(18) #True / False<br />
```<br />
* analog input<br />
안타깝게도 라즈베리파이는 analog input이 불가능하다. ADC(analog-digital converter)회로가 필요하다. **MCP3008**을 사용하도록 하자. (참고: https://learn.adafruit.com/reading-a-analog-in-and-controlling-audio-volume-with-the-raspberry-pi/overview) 혹은 간이로 만들수도 있다(참고: https://www.allaboutcircuits.com/projects/building-raspberry-pi-controllers-part-5-reading-analog-data-with-an-rpi/)<br />
<br />
* 프로그램을 종료하기전, 리소스를 반납한다. (필수)<br />
``` python<br />
GPIO.cleanup()<br />
```<br />
<br />
## 참고<br />
RPi.GPIO wiki: https://sourceforge.net/p/raspberry-gpio-python/wiki/BasicUsage/<br />
https://learn.sparkfun.com/tutorials/raspberry-gpio<br />
http://studymake.tistory.com/498<br />
<br />
[[category:raspberry pi]]</div>
Doguin